Patient Portal FAQs
Patient Portal email invites were sent out months ago but unless you were able to fully go through the process of setting up your portal account – the account is not activated.
*** Any of the images on this form can be viewed in a larger format by clicking on the picture ***
For family email accounts:
Multiple accounts can use a single email but the first account to sign up and set a password should be the managing account. Log into the first account setup with that email and allow the next patient to link to the first account.
Register for Patient Portal
When the patient first enters the patient portal, they must register and activate their account. Patients can register for the portal one of three ways:
- Self-registration
- Register with a patient portal Invite
- Social Media Login
Self-registration
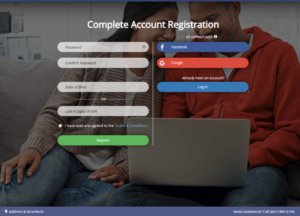
Patients do not need an email invite to create a patient portal account. Patients can complete the following steps for self-registration:
- Go to https://patientportal.advancedmd.com/127600/account/logon click Register to begin self-registration for the portal.
- After filling out the required information on the screen and clicking Register, the patient will receive a Patient Portal Account Notification email with a link to the Complete Account Registration screen. Patients should follow the instructions below in the Register With a Patient Portal Invite section to complete their patient portal account registration.
Important Notes:
- To register, the patient name and email entered on the Register a New Account screen must match the name and email provided to the office.
Register With a Patient Portal Invite
The following information must be entered to register and activate a portal account:
- New Password
Note: Passwords must contain a minimum of eight characters and include one upper case letter, one lowercase letter, one number, and one special character.
- The following identifiers:
- Birth Date – MM/DD/YYYY
Important Note: Do not type the ‘/’ on the date of birth and if your month or date of birth is a single digit, please type in a ‘0’ before the number. E.g. February 2nd of 1990 should be typed in as 02021990, which would show as 02/02/1990.
- Read and agree to the Terms & Conditions
- Click Register
Once the account is registered and activated, account holders are automatically logged in to the patient portal.
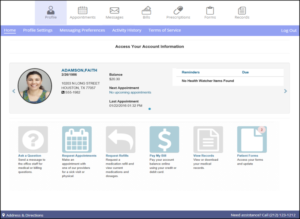
Patient Account Home Screen
Responsible Party Account Home Screen
The home page for a responsible party account holder displays account information for all associated patients. Associated patients display in alphabetical order. Move between associated patients by using the directional arrows, or by clicking on the next dot under each patient header.
Register Using a Social Media Account
Patients can conveniently access their patient portal using their Facebook® or Google® account login.
The following instructions explain how the patient can register, link, and unlink their patient portal account with their social media account.
Important Note: Privacy is important to us, and we only use social media account information to validate the patient’s identity. We will never access their profile or post to their social media account.
- From the Register screen, click the Facebook or Google button to link your patient portal account to your social media account. If you are not currently logged in to your social media account, enter your credentials.
After the accounts have linked, the Password and Confirm Password fields are no longer required and will not display on the Register screen.
- Enter the following identifier to register and activate your portal account:
- Birth Date – MM/DD/YYYY
Important Note: Do not type the ‘/’ on the date of birth and if your month or date of birth is a single digit, please type in a ‘0’ before the number. E.g. February 2nd of 1990 should be typed in as 02021990, which would show as 02/02/1990.
- Read and agree to the Terms & Conditions.
- Click Register.
Once the account is registered and activated, you are automatically logged in to the patient portal. You will be able to access your account using your social media login information.
Link Your Social Media Account
Go to the Patient Portal home page.
- Select Profile| Update Profile Settings.
- Click the Link Facebook Account or Link Google Account button to link your patient portal account to your social media account. If you are not currently logged in to your social media account, enter your credentials.
Now you will always be able to log in to your patient portal account using your social media login information.
Unlink Your Social Media Account
Go to the Patient Portal home page.
- Select Profile| Update Profile Settings.
- Click the Unlink Facebook from this account or Unlink Google from this account button to unlink your patient portal account from your social media account. You will be redirected to the patient portal home page.
Forgot Password
The following instructions explain the steps the account holder will take to reset their patient portal account password.
Go to https://patientportal.advancedmd.com/127600/account/logon.
- Click Forgot Password.
- Enter your email address.
- Click Send New Password.
- Click the link included in the Patient Portal Account Notification
Update Messaging Preferences
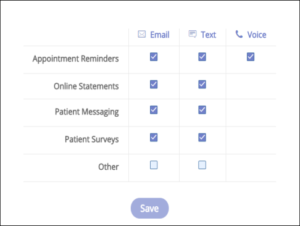
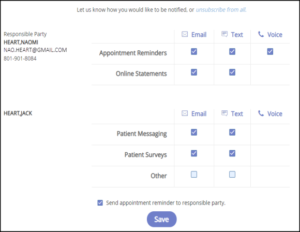
Patient portal account holders can update Messaging Preferences in the patient portal for the responsible party and patients.
Go to Profile | Messaging Preferences.
If the responsible party account holder has no patients tied to their account, they can change the messaging preferences for themselves for all notification types.
If the responsible party account holder has patients tied to their account, they can make changes for all patients and themselves. In addition to changing preferences for patients, they can choose to have Appointment Reminder notifications sent to the responsible party or the patient.
Receiving Messages in the Portal
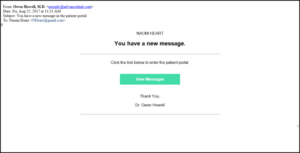
When you receive a message you’ll receive an email notification.
When the patient or account holder opens the patient portal, a number displays next to the Messaging menu item to indicate the number of messages received.
- The patient or account holder clicks the Messaging A new message is indicated by a red dot next to the date. Once a message has been opened the red dot no longer displays.
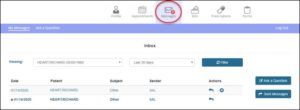
- The patient or account holder clicks on a message.

- The patient or account holder responds to message as required.
View HealthWatcher Reminders
Patients’ HealthWatcher reminders display in the patient portal. Reminders for appointments, procedures, labs, prescription refills, etc. display on the Patient Card in the portal. When an action is overdue, an alerting icon also displays.
Portal users can remove these reminders from the Patient Card by selecting the check box on the item.
Submit Patient Forms
Patients can access, fill out, and submit patient forms prior to their appointment.
- The patient, or responsible party, logs in to the portal. The Patient Forms icon displays with the number of forms to be completed.

- The patient, or responsible party, clicks the Patient Forms icon on the home page. The Patient Name, Appointment Date, Form Names, and Start button displays.
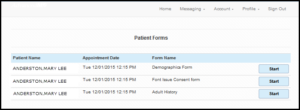
- The patient, or responsible party, clicks the Start button for a form. The form displays.
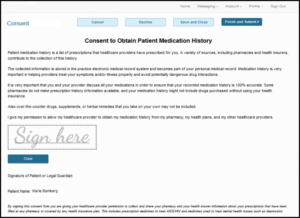
Note: A red asterisk displays next to the signature field to indicate that the signature is required. The patient or responsible party must sign a required signature field before submitting the form.
- The patient, or responsible party, completes the patient check-in forms and takes the following actions based on the type of form they are completing:
- Cancel– Closes the form screen
- Ask a Question– Opens the Messaging screen in the Patient Portal
- Save and Close– Saves the patient’s work and closes the form screen. Form status changes to Saved.
- Finish and Submit– Closes the form screen and sends the form back to your office for review. Form status changes to Submitted.
- Decline(Consent Form) – Closes the form screen and sends the form back to your office for review with no signature. Form status changes to Submitted in the portal Patient Forms grid, and the Status in the Patient Forms screen | Review Forms tab changes to Declined to Sign.

